Tutorial 01 – 师徒相授:有监督学习(Supervised Learning)
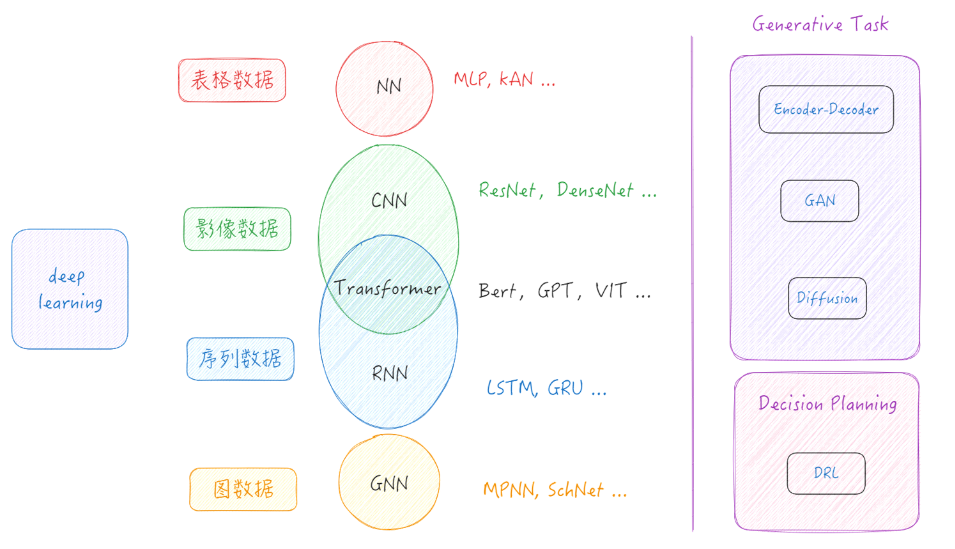
Learning Methods of Deep Learning
create by Deepfinder
 Agenda
- 师徒相授:有监督学习(Supervised Learning)
- 见微知著:无监督学习(Un-supervised Learning)
- 无师自通:自监督学习(Self-supervised Learning)
- 以点带面:半监督学习(Semi-supervised learning)
- 明辨是非:对比学习(Contrastive Learning)
- 举一反三:迁移学习(Transfer Learning)
- 针锋相对:对抗学习(Adversarial Learning)
- 众志成城:集成学习(Ensemble Learning)
- 殊途同归:联邦学习(Federated Learning)
- 百折不挠:强化学习(Reinforcement Learning)
- 求知若渴:主动学习(Active Learning)
- 万法归宗:元学习(Meta-Learning)
Tutorial 01 - 师徒相授:有监督学习(Supervised Learning)
 The Perceptron
-
第一个也是最简单的线性模型之一。
-
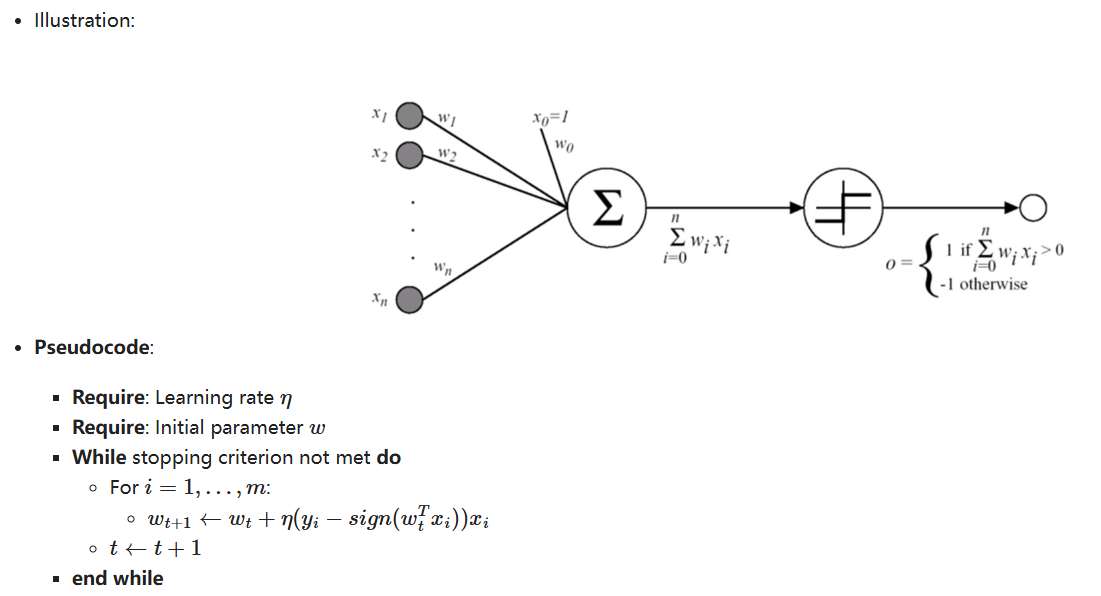
基于 线性阈值单元 (LTU):输入和输出是数字,每个连接都与一个权重相关联。
-
LTU 计算其输入的加权和:$z = w_1x_1 + w_2x_2 +....+w_nx_n = w^Tx$,然后对该和应用 阶跃函数 并输出结果:$$ h_w(x) = step(z) = step(w^Tx) $$
-
Illustration:
-
Pseudocode:
- Require: Learning rate $\eta$
- Require: Initial parameter $w$
- While stopping criterion not met do
- For $i=1,...,m$:
- $ w_{t+1} \leftarrow w_t +\eta(y_i -sign(w_t^Tx_i))x_i $
- $t \leftarrow t + 1$
- For $i=1,...,m$:
- end while
 Multi-Layer Perceptron (MLP)
-
MLP 由一个输入层、一个或多个隐藏层和一个最终输出层组成。
-
当隐藏层的数量大于 2 时,网络通常称为深度神经网络 (DNN),小于2成为MLP(一般情况下的一种习惯,不是定义)。
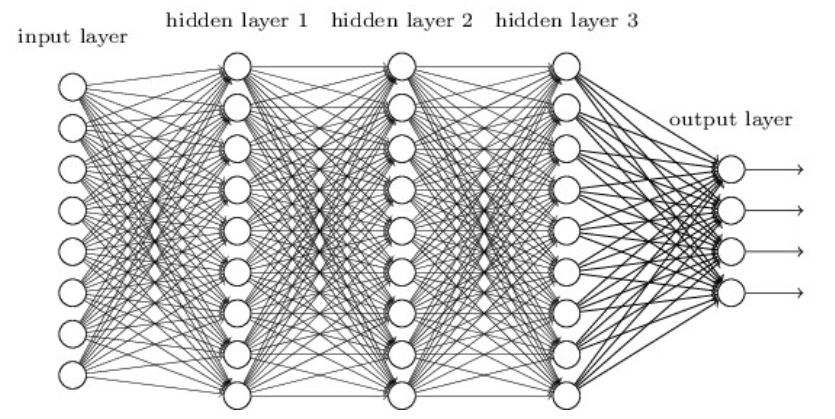
基于MLP可以衍生出各种各样的深度学习算法与模型

 深度学习算法与模型的训练逻辑

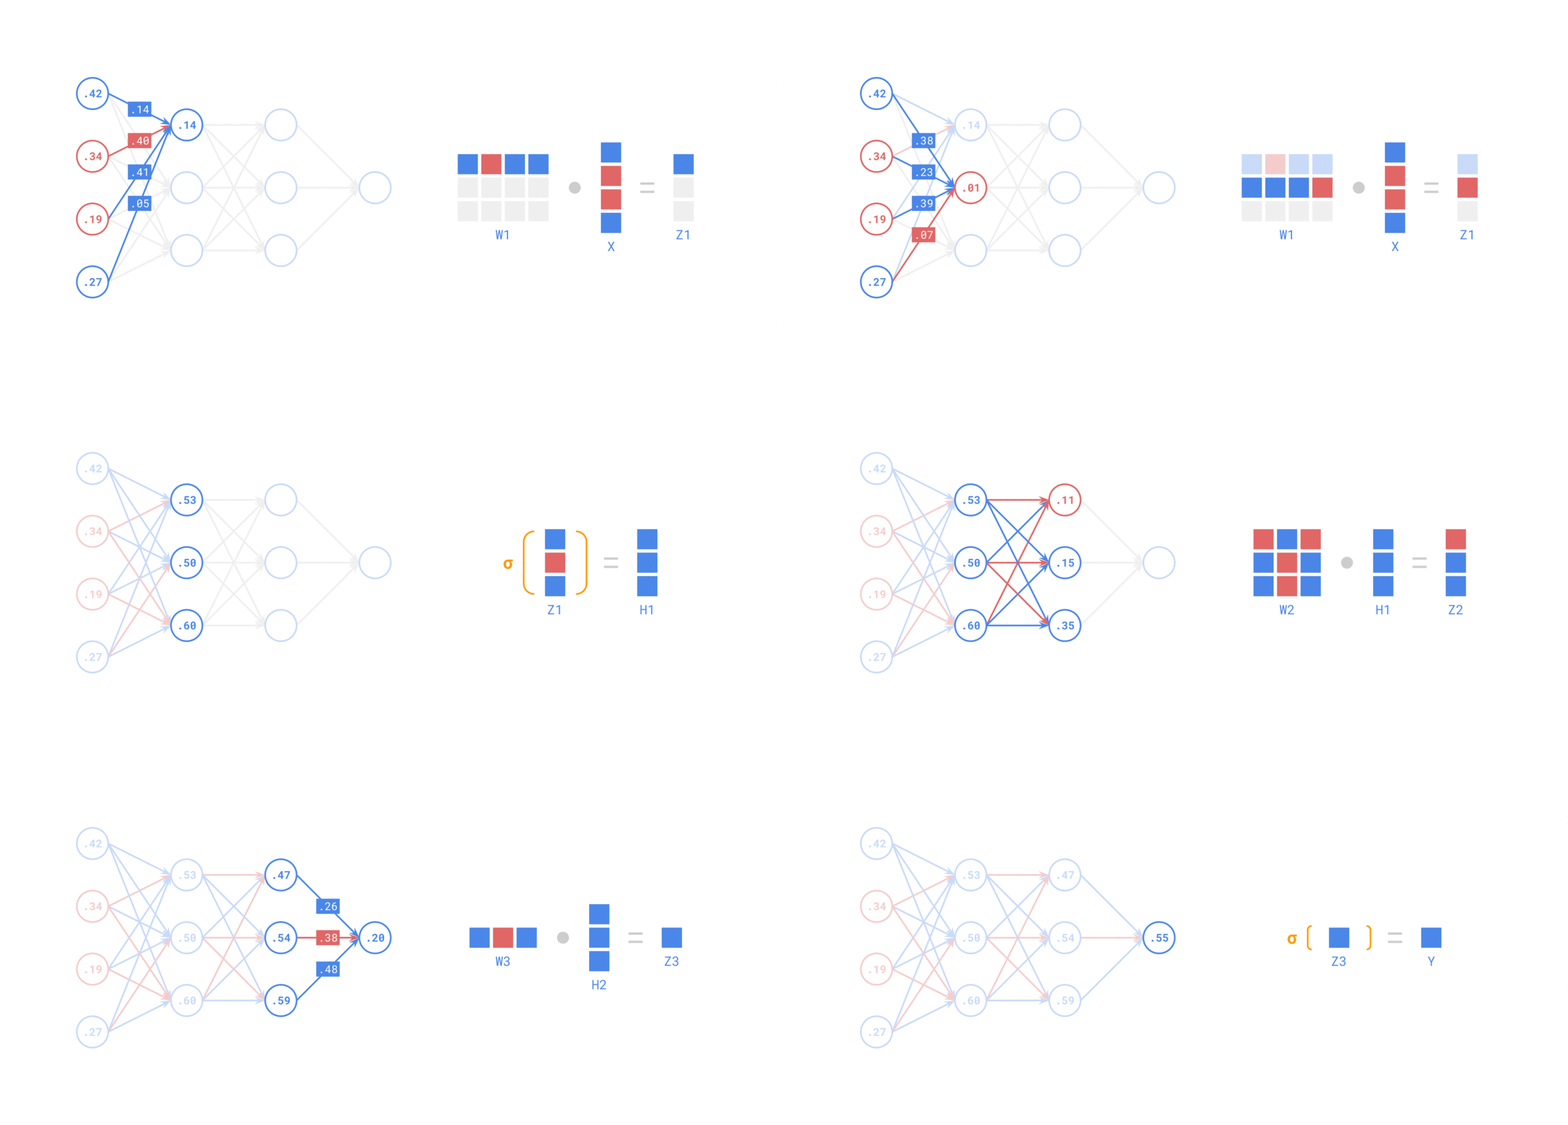
 Forward calculation
-
在 前向传递 中,对于每个训练实例,算法将其馈送到网络并计算每个连续层中每个神经元的输出
-
使用网络进行预测只是进行前向传递。
示例如下:
 Backpropagation
反向传播是一种有效的计算梯度的方法,它可以快速计算网络中每个神经元的偏导数。反向传播通过先正向传播计算网络的输出,然后从输出层到输入层反向传播误差,最后根据误差计算每个神经元的偏导数。反向传播算法的核心思想是通过链式法则将误差向后传递,计算每个神经元对误差的贡献。
示例如下:
初始化网络,构建一个只有一层的神经网络

(1)初始化网络参数:
假设神经网络的输入和输出的初始化为: $x_1=0.5, x_2=1.0, y=0.8$ 。
参数的初始化为: $w_1=1.0, w_2=0.5, w_3=0.5, w_4=0.7, w_5=1.0, w_6=2.0$ 。
(2)前向计算, 如下图
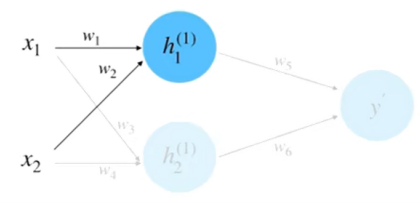
同理, 计算 $h_2$ 等于 0.95 。将 $h_1$ 和 $h_2$ 相乘求和到前向传播的计算结果, 如下图
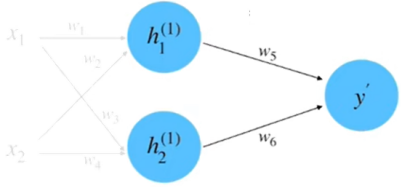
$$
\begin{aligned}
y^{\prime} & =w_5 \cdot h_1^{(1)}+w_6 \cdot h_2^{(1)} \\
& =1.0 \cdot 1.0+2.0 \cdot 0.95 \\
& =2.9
\end{aligned}
$$
(3)计算损失: 根据数据真实值 $y=0.8$ 和平方差损失函数来计算损失
$$
\begin{aligned}
\delta & =\frac{1}{2}\left(y-y^{\prime}\right)^2 \\
& =0.5(0.8-2.9)^2 \\
& =2.205
\end{aligned}
$$
(4)计算梯度: 此过程实际上就是计算偏微分的过程, 以参数 $w_5$ 的偏微分计算为例, 如下图
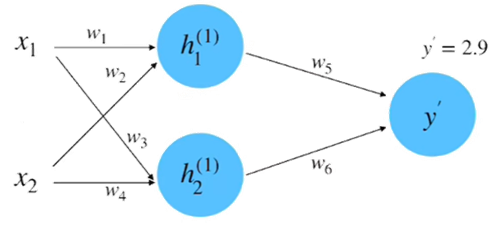
根据链式法则:
$$
\frac{\partial \delta}{\partial w_5}=\frac{\partial \delta}{\partial y^{\prime}} \cdot \frac{\partial y^{\prime}}{\partial w_5}
$$
其中:
$$
\begin{aligned}
\frac{\partial \delta}{\partial y^{\prime}} & =2 \cdot \frac{1}{2} \cdot\left(y-y^{\prime}\right)(-1) \\
& =y^{\prime}-y \\
& =2.9-0.8 \\
& =2.1 \\
y^{\prime} & =w_5 \cdot h_1^{(1)}+w_6 \cdot h_2^{(1)} \\
\frac{\partial y^{\prime}}{\partial w_5} & =h_1^{(1)}+0 \\
& =1.0
\end{aligned}
$$
所以:
$$
\frac{\partial \delta}{\partial w_5}=\frac{\partial \delta}{\partial y^{\prime}} \cdot \frac{\partial y^{\prime}}{\partial w_5}=2.1 \times 1.0=2.1
$$
类似的,如果以参数 $w_1$ 为例子, 它的偏微分计算就也用到链式法则, 过程如下所示。
$$
\begin{gathered}
\frac{\partial \delta}{\partial w_1}=\frac{\partial \delta}{\partial y^{\prime}} \cdot \frac{\partial y^{\prime}}{\partial h_1^{(1)}} \cdot \frac{\partial h_1^{(1)}}{\partial w_1} \\
y^{\prime}=w_5 \cdot h_1^{(1)}+w_6 \cdot h_2^{(1)} \\
\frac{\partial y^{\prime}}{\partial h_1^{(1)}}=w_5+0 \\
=1.0 \\
h_1^{(1)}=w_1 \cdot x_1+w_2 \cdot x_2 \\
\frac{\partial h_1^{(1)}}{\partial w_1}=x_1+0 \\
\frac{\partial \delta}{\partial w_1}=\frac{\partial \delta}{\partial y^{\prime}} \cdot \frac{\partial y^{\prime}}{\partial h_1^{(1)}} \cdot \frac{\partial h_1^{(1)}}{\partial w_1}=2.1 \times 1.0 \times 0.5=1.05
\end{gathered}
$$
(5)梯度下降更新网络参数:假设这里的超参数 “学习速率” 的初始值为 0.1 , 根据梯度下降的更新公式, $w_1$ 参数的更新计算如下所示:
$$
w_1^{\text {(update) }}=w_1-\eta \cdot \frac{\partial \delta}{\partial w_1}=1.0-0.1 \times 1.05=0.895
$$
同理, 可以计算得到其他的更新后的参数:
$$
w_1=0.895, w_2=0.895, w_3=0.29, w_4=0.28, w_5=0.79, w_6=1.8005
$$
到此为止, 我们就完成了参数迭代的全部过程。可以计算一下损失看看是否有减小, 计算如下:
$$
\begin{aligned}
\delta & =\frac{1}{2}\left(y-y^{\prime}\right)^2 \\
& =0.5(0.8-1.3478)^2 \\
& =0.15
\end{aligned}
$$
此结果相比较于之间计算的前向传播的结果 2.205 , 是有明显的减小的。
import torch
import torch.nn as nn
import torch.optim as optim
import torchvision
import torchvision.transforms as transforms

# 1. 超参数设置
batch_size = 64
learning_rate = 0.001
num_epochs = 2  # 这里为了示例,训练轮数设得较小,可自行增大

# 2. 数据加载与预处理
# MNIST 是 28x28 的灰度图像,这里使用随机裁剪、归一化等简单变换
transform = transforms.Compose([
    transforms.ToTensor(),  # 将 PIL Image 或 numpy.ndarray 转换为张量
    transforms.Normalize((0.1307,), (0.3081,))  # 使用 MNIST 官方推荐均值和方差进行归一化
])

train_dataset = torchvision.datasets.MNIST(
    root='./data',
    train=True,
    transform=transform,
    download=True
)
test_dataset = torchvision.datasets.MNIST(
    root='./data',
    train=False,
    transform=transform,
    download=True
)

train_loader = torch.utils.data.DataLoader(
    dataset=train_dataset,
    batch_size=batch_size,
    shuffle=True
)
test_loader = torch.utils.data.DataLoader(
    dataset=test_dataset,
    batch_size=batch_size,
    shuffle=False
)

# 3. 定义网络结构
class SimpleNN(nn.Module):
    def __init__(self):
        super(SimpleNN, self).__init__()
        # MNIST 输入图像大小 1x28x28,我们先将其铺平为 (batch_size, 784)
        self.flatten = nn.Flatten()

        self.fc1 = nn.Linear(28 * 28, 128)
        self.relu1 = nn.ReLU()

        self.fc2 = nn.Linear(128, 64)
        self.relu2 = nn.ReLU()

        self.fc3 = nn.Linear(64, 10)  # 10 类(数字 0~9)

    def forward(self, x):
        x = self.flatten(x)
        x = self.fc1(x)
        x = self.relu1(x)
        x = self.fc2(x)
        x = self.relu2(x)
        x = self.fc3(x)
        return x

# 4. 初始化模型、损失函数和优化器
device = torch.device("cuda" if torch.cuda.is_available() else "cpu")
model = SimpleNN().to(device)
criterion = nn.CrossEntropyLoss()  # 交叉熵损失常用于分类任务
optimizer = optim.Adam(model.parameters(), lr=learning_rate)

# 5. 训练函数
def train_one_epoch(model, dataloader, criterion, optimizer, device):
    model.train()  # 设置为训练模式
    running_loss = 0.0
    correct = 0
    total = 0

    for images, labels in dataloader:
        images, labels = images.to(device), labels.to(device)

        # 前向传播
        outputs = model(images)
        loss = criterion(outputs, labels)

        # 反向传播和优化
        optimizer.zero_grad()
        loss.backward()
        optimizer.step()

        # 统计损失和准确率
        running_loss += loss.item() * images.size(0)
        _, predicted = torch.max(outputs, 1)
        correct += (predicted == labels).sum().item()
        total += labels.size(0)

    epoch_loss = running_loss / total
    epoch_acc = correct / total
    return epoch_loss, epoch_acc

# 6. 测试函数
def evaluate(model, dataloader, criterion, device):
    model.eval()  # 设置为评估模式
    running_loss = 0.0
    correct = 0
    total = 0

    # 评估阶段不需要计算梯度
    with torch.no_grad():
        for images, labels in dataloader:
            images, labels = images.to(device), labels.to(device)

            outputs = model(images)
            loss = criterion(outputs, labels)

            running_loss += loss.item() * images.size(0)
            _, predicted = torch.max(outputs, 1)
            correct += (predicted == labels).sum().item()
            total += labels.size(0)

    epoch_loss = running_loss / total
    epoch_acc = correct / total
    return epoch_loss, epoch_acc

# 7. 训练与验证
for epoch in range(num_epochs):
    train_loss, train_acc = train_one_epoch(model, train_loader, criterion, optimizer, device)
    test_loss, test_acc = evaluate(model, test_loader, criterion, device)

    print(f"Epoch [{epoch+1}/{num_epochs}] "
          f"Train Loss: {train_loss:.4f}, Train Acc: {train_acc:.4f}, "
          f"Test Loss: {test_loss:.4f}, Test Acc: {test_acc:.4f}")
/home/arwin/anaconda3/envs/dl/lib/python3.8/site-packages/tqdm/auto.py:21: TqdmWarning: IProgress not found. Please update jupyter and ipywidgets. See https://ipywidgets.readthedocs.io/en/stable/user_install.html
  from .autonotebook import tqdm as notebook_tqdm

Epoch [1/2] Train Loss: 0.2726, Train Acc: 0.9208, Test Loss: 0.1360, Test Acc: 0.9585
Epoch [2/2] Train Loss: 0.1135, Train Acc: 0.9654, Test Loss: 0.0978, Test Acc: 0.9690
Credits
- Icons made by Becris from www.flaticon.com
- Icons from Icons8.com - https://icons8.com
- Datasets from Kaggle - https://www.kaggle.com/
- Jason Brownlee - Why Initialize a Neural Network with Random Weights?
- OpenAI - Deep Double Descent
- Tal Daniel
作者
arwin.yu.98@gmail.com

